Sunday, 15 December 2019

Seagull Models Mosquito SEA 285


Seagull Models have come out with this 1/8 scale Mosquito and I have to admit, I like it, so much so, that I bought one.  You never know when these things will be discontinued.  The outline is surprisingly good.  It is modeled after a restored example, KA114.  The real airplane was built in Toronto and restored by Avspecs, in New Zealand.  As such, it carries markings from 487 squadron, Royal New Zealand Air Force ( EG-Y ).

The kit comes with mechanical retractable landing gear ( ~95° ), featuring both up and down locks to eliminate servo load.  The wheels that come with the kit measure 3-7/8" diameter and are extremely light at 1.9 oz for the pair and yet they are also quite firm.  How do they do that?

The retract units weigh in at 12.5 oz

The oleos have a stroke of 13/16".  I took it apart to inspect the springs.  They measure 2-1/4" in length and 0.281" in outside diameter, with 0.032" wire.  They are compressed about 3/4" when fully extended.  I found that it took about 7 lbs to start to compress the oleos of 1 retract unit, with nearly 20 lbs when fully compressed.  This means that the oleos are likely not compressed at all on the ground and any compression will only serve to bounce the airplane back into the air.  Perhaps removing 1 of the springs will make it more realistic.  On the real airplane, the strut is extended 8" with no weight on the wheels and could be compressed up to 5" at empty weight.

The tailwheel is 1-3/8" and uses a 7/8" long extension spring that begins to actuate with about 2 lbs of force and is fully extended at 5 lbs.


The instrument panel does resemble that of a Mosquito.  The rest of the interior was typically painted interior green.  Many scale details can be added.

There are issues with the published center of gravity being too far aft.  This makes the airplane pitch sensitive and easy to stall, upon which, one wing will drop.  Moving the CG forward and/or reducing the elevator travel will help to prevent the stall.  Most people seem to be aiming for 130 mm back from the leading edge at the wing root, instead of the recommended 150 mm.  Also, the model does not have scale radiator intakes in the wing roots, which may act as stall strips, causing the root to stall first on the full size airplane.  Perhaps adding stall strips on the model might help in that regard.

A study of the wing geometry at 1/8.125 scale indicates that the 1/4 MAC is 362 mm forward of the trailing edge, which coincides nicely with 130 mm back from the leading edge on the model.

Engine pods with thick firewall, reinforced with triangle stock and about 2° right thrust built in.

The weight of various components, out of the box

Left Wing                                                                        23.6 oz
Right Wing                                                                      23.9 oz
Left Engine pod                                                                6.8 oz
Right Engine pod                                                              6.8 oz
Left Nacelle ( fiberglass )                                                  9.4 oz
Right Nacelle ( fiberglass )                                              10.0 oz
Fuel tanks ( both )                                                            3.8 oz
Engine Mounts and bolts ( both )                                      3.8 oz
Fuselage ( including tail, canopy and antenna )                 41.0 oz
Guns ( 4 )                                                                         1.3 oz
Pushrods                                                                          3.4 oz
Wing tube ( 25 mm OD, 23 mm ID, 765 mm OAL )         5.3 oz
Retract units ( both )                                                       12.5 oz
Main Wheels ( both )                                                       1.9 oz
Tailwheel                                                                         1.8 oz
Spinners with screws ( both )                                           5.0 oz
Pilot and Seat ( don't recommend using )                          3.2 oz
Hardware package                                                          4.1 oz
Miscellaneous (

Total                                                                            167.6 oz ( 10 lbs 7.6 oz )

Plus the following items, not included in the kit

Servos ( 10 ), as shown in the instructions
     - Spectrum A6000 ( 6 ), flight controls                       9.0 oz
     - Hitech HS-311 ( 2 ), throttles                                  3.0 oz
     - Hitech HS 5495BH ( 2 ), retracts                            3.2 oz
Engines ( 2 )  Saito 82                                                   32.6 oz
Propellers ( 2 ) Master Airscrew 12 x 8 3-blade               ?
Receiver ( 0.25 oz ), battery and switch ( 0.3 oz )             ?
Glue                                                                                 ?
Ballast                                                                              ?

Total Ready to Fly ( dry ), more than                           215.4 oz  ( 13 lbs 7.4 oz )               

Seagull recommends the following control surface movements,

Ailerons     15 mm low, 25 mm high, up and down
Elevator     15 mm low, 25 mm high, up and down
Rudder      20 mm low, 30 mm high, left and right

For comparison, using the same travel as the real airplane

Ailerons     26 mm up ( 26.5° ), 11 mm down ( 11.5° ) ( 19 mm average )
Elevator     23 mm up ( 21.5° ), 14 mm down ( 12.5° ) ( with CG near 25% MAC )
Rudder      40 mm left and right ( 26° )
The flaps should be set to 45°.

Due to the weight of the airplane, it will be flying about twice the scale speed, for a given angle of attack.  As a result, the roll rate will be double that of the full size airplane and so a low rate on the ailerons of about 50% should produce a scale rate of roll.  The Futaba 7C radio, that I will use, allows for differential aileron programming, with the second aileron servo plugged into channel 7.

A page out of The Mosquito Manual

 A decal sheet is provided with markings for F-Freddy.  The "Buzz Buggy" nose art belongs on a C-47

For those wanting to improve the scale looks of the model, there are a few things that can be done.  I've narrowed it down to a few items, in order of importance.

1.  Scratch build a decent cockpit.
2.  Replace the roundels with those from Major Decals sheet 200 ( except the fin flash )
            - they are too small, too light in colour and not placed properly on the wings
            - Wing roundels should be 6.75" in diameter, placed about 13-3/8" inboard from the wingtip, between the leading edge and the aileron, with about a 1/8" gap.
3.  Replace the spinners with 3 blade versions
4.  Different code letters and serial number
5.  Try to fit scale 5.5" main wheels, or at least something larger than what is supplied
             - this will require surgery to move the struts farther apart and maybe cutting into the wing

The fuselage roundels would be "Medium" size, or 4.5" in 1/8 scale

Serial Number Detail

The above information came from this book.

Stencils and other Mosquito markings are available from Callie Graphics

Sunday, 24 November 2019

Top Flite P-47 ( red box )


I scored this kit on E-bay.  I think the planets lined up for this one ( The "buy it now" price was the equivalent to $34 in 1976 ).  It amazes me how many of these old kits are still laying around.  Now, I just need a Gold Edition razorback to go with it.  Of course, it will have flaps, retracts and a four-stroke.

The prototype of this model competed in the 1974 NATS and finished 2nd, behind Dave Platt and his Fw-190D in the standoff scale catagory.  What a fun rivalry that must have been.

I'm having a hard time choosing a colour scheme.  Here are the choices,

1.  "Oh Johnnie", flown by Raymond Knight in Italy.  The only P-47 pilot to receive the medal of honor in the European theatre.  The other was Neel Kearby, in the Pacific.


2.  "The Irish Shillalah", flown by James Finnegan.  He caused Adolf Galland to crash land his Me-262.  They met after the war.


3.  The default kit markings of Glen Eagleston, even though he scored all his victories in the P-51.


4.  A Russian example, in honor of Alexander Kartveli and Alexander de Seversky


5.  A Chinese example, pg 183 of Bodie's book.


6.  Francis Gabreski, the 56th Fighter Group was the first to fly the P-47 and they never traded them for P-51s.
What are the chances of finding 5 more kits? haha

Looking at the plans,
The wing seems to have a reasonably accurate outline, with root chord of 14" at the centerline and half span of 30".  Aileron movement is shown as 3/8" up and down ( 8.5° ) at cross section C-C.  This seems ideal to give a realistic roll rate.  I would program this as the low rate at 60%.  The real airplane had differential ailerons, deflecting 16° up ( approx 11/16" ) and 12° down ( approx 1/2" ) , or 14° average.  The flaps should have a travel of 40°.  Installing retracts is left up to the builder.  For accuracy, the gear was angled back in plan view by about 12° and also angled forward in side view by the same amount.

Machine gun barrel sleeves can be made from 1/4" OD aluminum tubing or dowels, spaced 3/4" apart and staggered by about the same amount ( or 25/32" if you want to get picky ).


The canopy is too large and needs to be cut down some.  For reference, the aft part of the canopy was 62" long on the real plane and should be 7-3/4" on the model.  I measured over 9".  Correct sized wheels for 1/8 scale would be 4-1/4" for mains and 1-3/4" for tail.


Build and flight videos to follow on YouTube.


Sunday, 3 November 2019

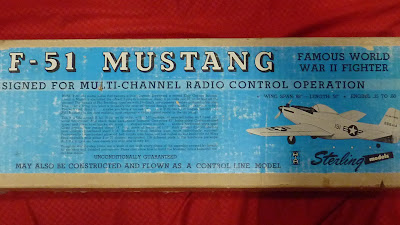
Sterling Models F-51 Mustang ( kit number FS10 )

Sometime in the late '80s, I was given a model of a Mustang.  At the time, I was a teenager and had no idea what it was.  I had never heard of Sterling Models.  This was the first 'scale' warbird I had ever flown and the first with flaps.  It did not have retracts.  It was painted a dull grey, as I recall.  After a short period, it was either sold or given to someone else who showed an interest in it.  Perhaps they recognized it as the piece of radio control history that it was.


This kit ( FS-10 ) was produced in the early 1960s.  There were models in competitions in 1962, so it predates that.  It was still in production as of the 1975 catalog, but sometime before 1983, it was discontinued.  

The markings are completely fictitious, with tail number 886414.  However, if you flip those numbers around ( 414886 ), you have the serial of a P-51D-15 model.  I'm not sure why Sterling ( or Phil Breittling sp? ) didn't choose a real subject.  Just two airframes later ( 414888 ) is the famous "Glamorous Glen III", flown by Chuck Yeager.


While the model is very "stand-off" scale for a D model, it looks better as an H model.  The kit doesn't specify but, I'm pretty sure it was supposed to be modeled after the H model, with how the landing gear looks, the missing leading edge extension and the smaller dorsal fin.

The top airplane is a D model, while the bottom is an H model.


The instructions are printed on the plans.


The balance point for radio control is shown exactly 1-1/8" behind that for the control line setup.  The wing plans are on the other side of the sheet.


I'm going to build the kit as stock as possible, right down to the sewn hinges and brass sheet landing gear doors.  All I need to do is find a Veco S7 2-3/4" spinner, T29D clunk fuel tank and some period 3.5" wheels.


Monday, 30 September 2019

Art Johnson's P-38

Once upon a time, there was a P-38 model that never flew.  It was built from a Royal kit.  I thought it was cool, but not many of them survived for very long.  To this day, I have only seen one P-38 model fly ( Wing Mfg ).  Several models were considered, mainly the VQ ( Legend ) model and the Ziroli.  Other ARF models look like cartoon character versions of the real airplane.  The VQ model was going to cost me $900 US just to get it here and the Ziroli is also a huge build that will cost more than I can spend at the moment, by the time you add up all the accessories, landing gear, engines, etc.  Not to mention that it would require a new vehicle or a trailer, just to transport the thing.

Enter Col Art Johnson

He was a WW2 veteran who had joined the USAAF in hopes of being able to fly a P-38.  Well, he ended up flying everything but and so when he retired, he decided to build a radio control model.  The plans for which were published in the June 1978 issue of Model Builder.  It's a good size ( 15% scale, or 1.8" to the foot ) and should *just* fit in my car.

Col Art Johnson AMA biography

Also, check out the construction article.

Construction article from June 1978 Model Builder

P-38L-5 44-25319 was destroyed on April 7, 1945 in a mid-air collision.  Edmond Schieve was the pilot.  The other aircraft involved was P-38 44-25579, piloted by Jerry M Brown.  Both aircraft belonged to the 59th FS of the 33rd FG in India.

This model placed fifth in sport scale at the 1977 Nationals at March AFB, in Riverside, California.  As a sport scale model, some compromises were made from true scale.  The most obvious being the landing gear.  The real airplane sat at a 5.5 degree angle nose up, when on the ground, with a 13 degree clearance angle to the tail skids.  Scale wheel diameters would be 4" for the nose and 5.5" for the mains, where the plans show 3" and 4" respectively.  Art used 90 degree Rhom Air retracts.  It's amazing that his airplane weighed only 13 lbs ready to fly, without fuel.  Art's airplane also did not have flaps.  He didn't know how to make operational Fowler type flaps and left it up to the builder.  Although, he could have incorporated a plain or split flap, as Ziroli had done.

For more scale accuracy, the following modifications should be made to the plans

1.  Correct wing tip airfoil ( NACA 4412 )
2.  Correct aileron span
3.  Constant chord flaps of correct span
4.  Correct spacing between booms
5.  Longer booms and center pod
6.  Correct geometry landing gear
7.  Span and chord of horizontal stabilizer


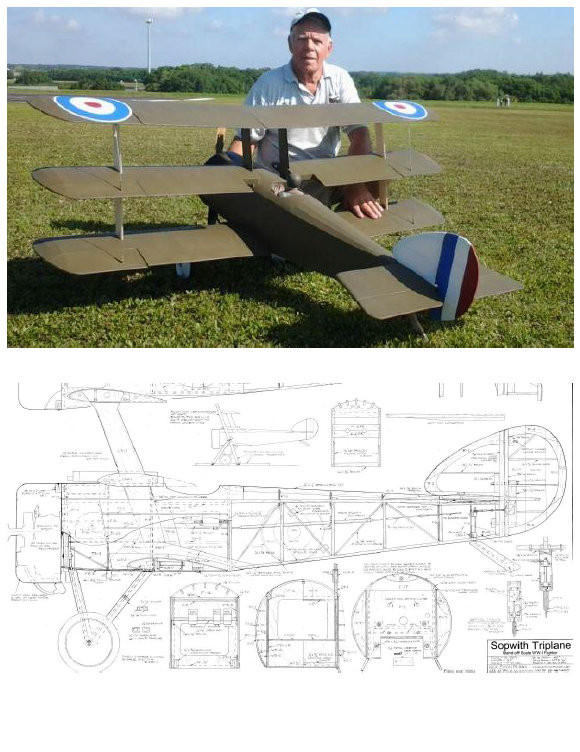
Ziroli Plans Sopwith Triplane Modifications


Image from Ziroli Plans website


If it weren't for the Sopwith Triplane, the Fokker Dr.1 would not have existed. There are far too many of the latter around. Nick Ziroli is more known for his WW2 designs, so his WW1 types are more "standoff scale". For the really discerning builder, there are more accurate plans/kits available.


This model is somewhere between 1/4 and 1/5 scale, depending on which dimensions you are looking at. The choice to call it 1/5 scale is one of marketing, I think. To go head to head with other 1/4 scale offerings is probably not a wise decision. However, when one looks more closely at the plans and takes some measurements, it turns out that the model is much closer to 1/4 scale in all but wingspan.


A 1/4 scale Balsa USA Pup, for example, has a 9 inch cowl, whereas this airplane is 9.25". The tail surfaces are almost exactly 1/4 scale. So, why were the wings clipped? It would seem that the reason is to improve flyability under most conditions by keeping the wing tips out of the dirt and making it easier to fly in wind. It is also heavy, at near 20 lbs, when most 1/4 scale models are around 14 or so. The plan shows a G-38 engine and it still needed 2 lbs of weight in the front of the cowl.


For those who want a WW1 type, but don't want to deal with delicate construction and wire rigging, this triplane might be for you and there are some very simple things that can be done to improve the scale accuracy with very little effort. Simply adding 2 rib bays to each wing panel would increase the span of each wing by 12" and bring the aspect ratio up to where it should be, as well as adding a good 300 sq in to the wing area. That by itself would probably be enough. With a little more effort, one could substitute an aluminum cowl from Balsa USA or Mick Reeves and make it work, while maybe being able to remove some nose weight. Going with larger wheels is also an option. The plan calls for the Dubro 5.6" wheels, but one could upgrade to the William's Bros 6-5/8" or the Dubro 7" wheels. Since the landing gear wire needs to be bent anyway, spreading the wheels apart to a 1/4 scale 16.5" ( They are about 13.5" on the plan ) is not a bad idea either.